|
|
Export to NC  : Options and Results

Access: Open this function from the following location:
-
Select File > Export > Export To NC from the Part menu bar.
Export a part (from a Cimatron Part file) or multiple parts or sub-assembly (from a Cimatron Assembly file) to a single Cimatron NC (Subtractive Manufacturing) file for post-printing operations, such as milling, drilling, etc.
When files have been exported to NC, the NC environment is loaded and the Import from Part/Assembly function is invoked.
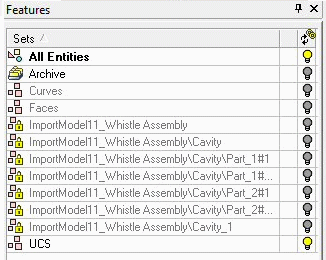
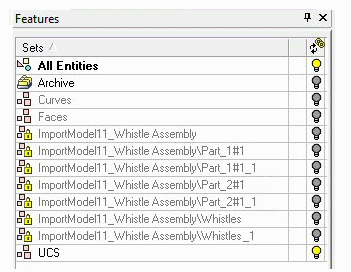
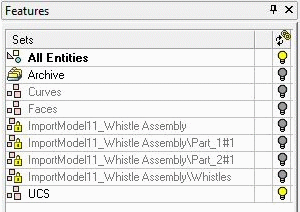
When exporting a sub-assembly to NC, the assembly structure is not lost when imported into NC. You can easily select the parts and sub-assemblies to be imported by using the Component Chooser dialog, and the entire assembly structure is kept as read-only sets. Folders within Sets can also exported. Using these sets, you can control the visibility of components and program accordingly. This functionality is particularly useful when working with fixtures, molds, and die sets with multiple components.
See the example in Export to NC.
Note: Additional Import/Export operations are available, either between Cimatron files or between Cimatron and external file formats (file formats of a different vendor). For the latter operation, the Data Interface environment provides numerous options to perform this task.
Required Step 1 
Select the part(s) to be exported to the NC environment.
The parameters that are displayed depend on whether an assembly or part was active at the time the function was invoked:
|
Assembly Parameters: |
Part Parameters: |
|
|
|
If a Part file is open, the part is automatically selected, the NC environment appears and the Import from Part/Assembly function is invoked. |
Assembly Parameters:
|
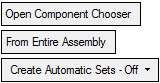
Open Component Chooser |
Display the Component Chooser dialog. This option is only displayed if an assembly, sub-assembly, or components in an assembly are involved in the operation. Select the components to export. Note: If the toggle option below is set to From Active Component (and the active component is a sub-assembly), the Component Chooser dialog limits the selection to the active component (all other components are unchecked and grayed out). If the active component is a part, the Component Chooser dialog is not displayed as the part is automatically selected. |
||||||||||
|
From Entire Assembly |
This is a toggle option that enables you to either select component(s) from the entire assembly or to only select the active component. The toggle options are From Entire Assembly / From Active Component.
|
||||||||||
|
Create Automatic Sets - Off |
This is a dropdown list of options that enables you to control the creation of Automatic Set(s) for the exported/imported items. These automatic sets can be created for each assembly part you are importing, which simplify display control of the parts once you are in the NC file. These parameters are also displayed in the following functions: Export to New Part and Import from Part/Assembly. The following options are available when exporting to NC or importing to NC from an assembly file:
Notes:
|
When you are finished, press OK ![]() in the Feature Guide; the NC environment is loaded and the Import from Part/Assembly function is invoked. See Export to NC: Editing for additional information.
in the Feature Guide; the NC environment is loaded and the Import from Part/Assembly function is invoked. See Export to NC: Editing for additional information.
Notes:
-
The relevant parts are exported to a single NC file.
-
The assembly and part hide/show status remains the same in the NC file.
-
If PMI (in assemblies) is attached to components selected for export, it is exported to the NC file. If the PMI is connected to components that are not selected for export, the PMI is not exported. If the PMI is connected to more than one component and at least one of these components are selected for export, the PMI is exported to the NC file.
-
The main assembly UCS is exported to the NC file.
-
After the Export to NC operation, any change (in the Assembly environment) to exported assembly components or exported sub-assemblies will cause the NC parts to be marked as Not Updated.
-
-
If a sub-assembly was selected for export and exported to NC, and components are later added to the sub-assembly, these additional components are added to the NC file when the Update operation is performed.
-
If a sub-assembly was not selected for export, but components under it were exported, adding components to the sub-assembly will not add these components to the NC file when the Update operation is performed.
-
If a main assembly was selected for export and exported to NC (using Export to NC), these components will not be added to the NC file when the Update operation is performed.
-
|