|
|
Conflict Solver
The Conflict Solver is an interactive dialog used to inform you of geometric problems that arise while you create or edit features, or during the regeneration process (as a result, for example, of a Suppress/Unsuppress operation). When a feature encounters a problem, the Conflict Solver dialog will tell you why, and ask how and if you want to proceed.
Example Conflict Solver dialogs are displayed below (see the dialog explanations):
|
Conflict Solver dialog: |
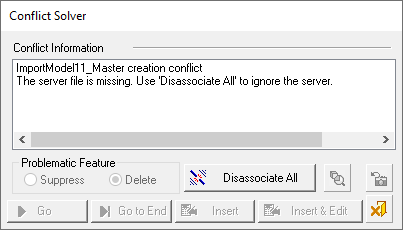
"Special case" dialog displaying the Disassociate All button - see the dialog explanations below: |
|
|
|
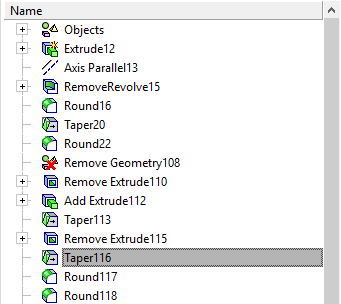
If a failure occurs during a regeneration process (for example after an Edit operation), the regeneration process will stop just before the problematic feature. The valid part of the model will be displayed (in insert mode), the Conflict Solver dialog is displayed and the problematic feature is highlighted in the Feature Tree.
- Conflict Solver Dialog Example
- Problematic Feature Highlighted in Feature Tree
- Conflict Solver Dialog Explanation
- Additional Examples
Conflict Solver Dialog Example
In the case of a conflict, the valid part of the model will be displayed (in insert mode) and the Conflict Solver dialog is displayed (for the dialog explanations, see below):
|
|
|
Problematic Feature Highlighted in Feature Tree
In the case of a conflict, the problematic feature is also highlighted in the Feature Tree.
When a problem is encountered and the Conflict Solver dialog is displayed, the problematic feature is highlighted in the Feature Tree, as shown below:
|
|
|
Note: In the DieDesign application, an additional option is available in the popup menu: Highlight Next Suppressed Feature. In the event of multiple suppressed features, this option opens the Feature Tree at the appropriate place and highlights the next suppressed feature in the tree.
Conflict Solver Dialog Explanation
The Conflict Solver dialog is displayed:
|
Conflict Solver dialog: |
"Special case" dialog displaying the Disassociate All button - see the dialog explanations below: |
|
|
|
The Conflict Solver dialog contains the following:
|
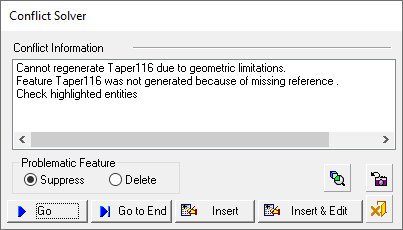
Conflict Information |
This section explains what the problem is. |
|
Suppress / Delete |
|
|
Disassociate All |
The Disassociate All button (see the example dialog above) is only displayed in cases where all the following conditions exist:
Pressing this button disassociates all Import features (from the parent file(s)) and completes the required feature creation operation (unless a different conflict occurs). See Conflict Solver Examples for an occurrence where this button is displayed. Note: If the server exists but is not updated, the Disassociate All button is not displayed. In this case, if the button does appear (due to another part with a missing server), it will not disassociate features where the server exists but is not updated. |
|
Go |
Suppress or Delete the failed feature and continue the regeneration to the next problematic feature. |
|
Go to End |
In the Part environment: In the Assembly environment: |
|
Insert |
The Insert button is only available during regeneration (not after feature creation) except for the last feature. In the Part environment: In the Assembly environment: Note: The Insert button is replaced with the Edit button when a new feature is being created and the execution fails. |
|
Edit |
The regeneration process stops on the failed feature and the feature can be edited. The Edit button is displayed when a new feature is being created and the execution fails. |
|
Insert & Edit |
The Part file becomes active and the feature directly enters edit mode. This enables you to directly edit the feature that caused the failed execution. Notes:
|
|
|
Zoom the display to the problematic entity. |
|
|
Return the display to the previous picture (the display as it was prior to using the Zoom button). |
|
|
The Regeneration or the Creation is cancelled. If the regeneration occurred automatically as a result of some other operation (e.g. an Edit feature operation) this operation will also be cancelled. |
For additional examples of how or why the Conflict Solver is displayed, see Conflict Solver Examples.
Notes:
-
While the Conflict Solver is running, the usual Zoom, Pan and Rotate operations can still be carried out.
-
If a failure occurs during approval of a feature (after an OK/Apply operation), the Conflict Solver dialog will be partly disabled. Only the Edit and Cancel options will be available. You can either cancel the procedure or edit it.
-
The Assembly procedure is as follows:
If you select Suppress/Delete with the sub-option Go to End, the operation will work on all components. You will only see one Conflict Manager. -
If you select Insert, the current part will enter Insert mode. The dependent parts will also enter Insert mode on their 1st dependent feature.
-
When the editing/regeneration session (that led to the failure) is complete, the system will automatically activate the 1st part with the failure. This will allow you to fix the problematic feature.
-
After fixing the problematic feature, select Go to End from the popup submenu in the part environment. The part will be regenerated and so will all the other parts that are in Insert mode.
-
You can also select the option Go to End from the Assembly environment, if you have activated the assembly or closed the file and then re-loaded it before previously using Go to End (the Go to End option is available in the Assembly menu bar and also the popup submenu).
|