|
|
Import From Part/Assembly  : Options and Results

Access: Open this function from the following location:
-
Select File > Import > From Part/Assembly from the Part menu bar.
Import geometry from a part or an assembly.
Import a part from a Cimatron Part file or one or more components or sub-assemblies (or the entire assembly) from an Assembly file.
When files have been exported to NC, the NC environment is loaded and the Import from Part/Assembly function is invoked.
The model is displayed in the graphics area and is positioned by default on the Model UCS of the current part file. The imported part can be re-positioned and rotated as required.
Notes:
-
Additional Import/Export operations are available, either between Cimatron files or between Cimatron and external file formats (file formats of a different vendor). For the latter operation, the Data Interface environment provides several options to perform this task.
-
For information regarding associativity in import/export operations in the Part application, see Associativity.
Required Step 1 
The Cimatron Explorer is displayed; select the components to be imported and set the import parameters.
The parameters that are displayed depend on whether an assembly or part was active at the time the function was invoked:
|
Assembly Parameters: |
Part Parameters: |
|
|
|
|
|
Assembly Parameters:
|
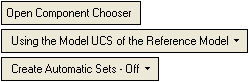
Open Component Chooser |
Display the Component Chooser dialog. This option is only displayed if an assembly, sub-assembly, or components in an assembly are involved in the operation. Select the components to import. |
||||||
|
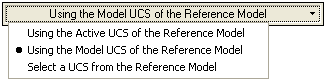
Using the Model UCS of the Reference Model |
This is a dropdown list of options that enables you to select the required positioning option.
|
||||||
|
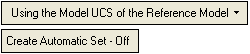
Create Automatic Sets - Off |
This is a dropdown list of options that enables you to control the automatic Set(s) creation for the imported items. These options are the same as when exporting an assembly to NC; for an explanation of these parameters see the Export to NC. |
Part Parameters:
|
Using the Model UCS of the Reference Model |
This parameter is the same as that for Assembly files; see the Assembly parameter explanation above. |
||||
|
Create Automatic Sets - Off |
Notes:
|
Optional Step 1 ![]()
Set optional parameters as follows:
-
Click
 . The following dropdown list is displayed:
-
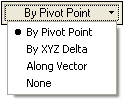
Select the required option based on the point or axis where the part will be positioned, as follows:
|
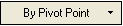
By Pivot Point |
The part will be placed on the pivot point. First, pick the origin point and then the destination point that determines the relative placement vector. If you want to change the destination, click the existing destination point and then pick a new point. To re-pick both points, click the existing origin point and then re-pick both points. |
|
By XYZ Delta |
Define the XYZ delta offset values for the part location. |
|
Along Vector |
The part will be placed along a selected vector at a specified delta distance. Use the directional arrow to set the set the vector direction and set the delta value - the absolute distance by which the part will move. You can click on the arrow head or body to reverse the direction. |
|
None |
Click this option to define no values. |
Important: Up to Cimatron 9.x, all vectors and delta offset values and rotation values (in the optional steps) were with respect to the Model UCS of the imported part. From Cimatron 10.0, these values are with respect to the picked (or Active) UCS of the imported part. This change only refers to import features created in Cimatron 10 onwards.
Optional Step 2 
Set optional rotation parameters.
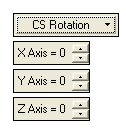
See the Important Note in Optional Step 1 above.
When you have set the parameters, press OK ![]() or Apply
or Apply ![]() in the Feature Guide to complete the function.
in the Feature Guide to complete the function.
An ImportModel feature is displayed in the Feature Tree with the disassociate icon  .
.
Note: For information regarding associativity in import/export operations in the Part application, see Associativity.
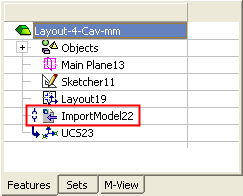
A timestamp is appended to the name of an imported part file in the Feature Tree. The timestamp consists of the date and time of the import translation (separated by an underscore) using the region settings 'short date' format set up on the users system. For more, see Feature Tree Structure > Imported objects.
Notes:
-
See Feature Tree: Structure for additional information regarding imported objects displayed in the Feature Tree.
-
You can import more than one part to a model file.
-
The location and orientation of the imported part will be set according to that of the source part.
-
All sets in the source file will be imported into the client file. Sets already existing in the client file are not overwritten by imported sets.
-
Imported sets are disassociated with the source file.

|