|
|
Stock  : Options and Results


Access: Open this function from the following location:
-
Select Solid > Creation > Stock from the menu bar.
Obtain the overall size of a part or create a bounding box (stock) around it. In 2D optimization mode, the box is based along the directions of the active UCS. In 3D optimization mode, the system analyzes and calculates the box orientation and the resulting stock is the minimum bounding box or bounding cylinder around the part. The stock size can be manually manipulated.
Using this function provides an easy way for a designer to find a molding orientation and for a CNC operator to set up a direction on a mill.
Within the function, several on-screen options allow you to add extra stock to the part or round the stock size to a nominal number. When the stock is saved as a solid box, it gets placed on an automatic set and can be marked as a cutting object. Whether or not you create the actual stock geometry, the function can still place the overall part dimensions into the Stock Size attribute, where it can be used for the Bill of Materials.
Required Step 1 
Select the entities for which a stock is to be defined. Pick objects, faces or wires.
Required Step 2 
Set the stock parameters. 2D and 3D optimization is available when defining the stock size and shape. Similar parameters are displayed for both methods.
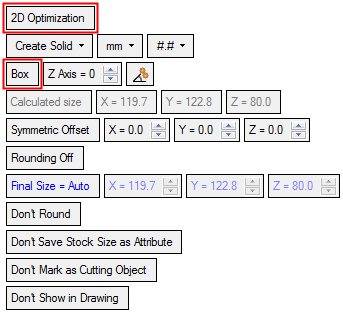
In 2D Optimization mode, the box is based along the directions of the active UCS. The following parameters are displayed:
|
2D Optimization Box stock parameters: |
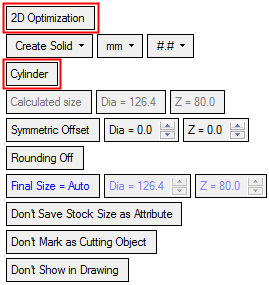
2D Optimization Cylinder stock parameters: |
|
|
|
|
|

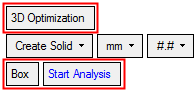
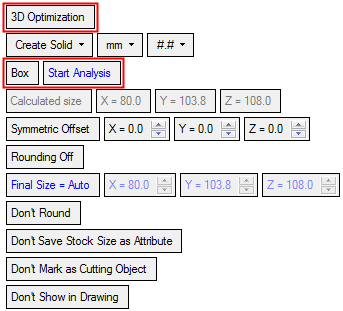
In 3D Optimization mode, the system analyzes and calculates the box orientation and the resulting stock is the minimum bounding box or bounding cylinder around the part.
The following parameters are displayed. When the Start Analysis button is clicked, the system calculates and finds the smallest 3D box or cylinder, and also displays the remaining parameters.
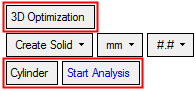
Press the Start Analysis button in the respective image below to display the remaining parameters.
|
3D Optimization Box stock parameters: |
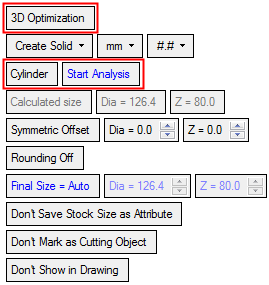
3D Optimization Cylinder stock parameters: |
|
|
|
|
|
Parameters
|
2D Optimization |
This is a toggle option 2D Optimization / 3D Optimization which determines the type of calculation to define the stock.
|
||||||||||||
|
Create Solid |
This is a dropdown list with the following options:
Note: Depending on the selected option, some of the parameters below are not displayed or are displayed grayed out. |
||||||||||||
|
mm |
Select the required units of measurement from the dropdown list. |
||||||||||||
|
## |
Select the required precision (decimal places) from the dropdown list. |
||||||||||||
|
Box |
This is a toggle option Box / Cylinder which sets the shape of the stock.
|
||||||||||||
|
Z Axis |
Rotate the box result around the Z direction (of the active UCS). For each change, the Calculated Size and Final Size = Auto are recalculated.
This button is displayed for the 2D Optimization, Box option. |
||||||||||||
|
|
Click this button to automatically find the rotation angle (Z axis value) that gives the smallest 2D-optimized box size.
This button is displayed for the 2D Optimization, Box option. |
||||||||||||
|
Start Analysis |
When the Start Analysis button is clicked, the system calculates and finds the smallest possible 3D box or cylinder, and also displays the remaining parameters. |
||||||||||||
|
Calculated Size |
This parameter displays the calculated size of the minimum bounding stock. The parameters displayed depend on the stock shape selected. The parameter values are grayed out and cannot be changed. For Box, the XYZ values are displayed. For Cylinder. the Diameter and Z values are displayed. See the parameter images above. |
||||||||||||
|
Symmetric Offset |
This is a toggle option Symmetric Offset / Non-Symmetric Offset which sets the method of defining offsets to the stock shape. For Box stocks, XYZ offset direction parameters are displayed. For Cylinder stocks, the Diameter and Z offset direction parameters are displayed. See the parameter images above.
|
||||||||||||
|
Rounding Off |
This is a toggle parameter Rounding Off / Rounding On which enables you to round the stock size. The Final Size parameter reflects value of this parameter.
|
||||||||||||
|
Final Size = Auto |
This is a toggle parameter Final Size = Auto / Final Size = Manual which enables you to accept the automatically calculated size or to manually adjust the size.
|
||||||||||||
|
Don't Round |
This is a toggle parameter Don't Round / Round Corners which is only displayed when the stock is saved as a solid box and enables you to round the box corners. When Rounding On is selected, an additional parameter, Radius, is displayed enabling you to set the round values.
|
||||||||||||
|
Don't Save Stock Size as Attribute |
This is a toggle parameter Don't Save Stock Size as Attribute / Save Stock Size as Attribute which enables you to display the size of the stock in the Stock Size attribute in the Cimatron Explorer Properties pane.
|
||||||||||||
|
Don't Mark as Cutting Object |
This is a toggle parameter Don't Mark as Cutting Object / Mark as Cutting Object which is displayed when the stock is saved as Create Solid and enables you to mark, or not mark, the object as a cutting object. |
||||||||||||
|
Don't Show in Drawing |
This is a toggle parameter Don't Show in Drawing / Show in Drawing which is displayed when the stock is saved as a solid box and enables you to show, or not show, the object in a view. |


When you have completed the steps, click OK ![]() or Apply
or Apply ![]() in the Feature Guide to complete the function. The stock object is created.
in the Feature Guide to complete the function. The stock object is created.
When completed, the Stock feature will appear in the Feature Tree as follows:
The new entities are also added to the Stock set, in the Sets tab of the Feature Tree.

|